Installation
Dual-licenseWe introduced some breaking changes in the plugin, and the ways you map your resources to EventCatalog resources.
We recommend using the latest version of the plugin. You can read the migration guide to help you upgrade.
Configuring EventCatalog for Backstage
You will need an EventCatalog Scale license key to use the Backstage integration.
You can get a 30-day trial Scale license key from EventCatalog Cloud.
Once you have an EventCatalog Scale license key, you will need to build and deploy your EventCatalog with the license key set.
1. Setting license key in .env file (recommended)
eventcatalog@2.35.4Create a .env file in the root of your project and add the following:
EVENTCATALOG_SCALE_LICENSE_KEY=your-scale-license-key
If you already have an older Backstage plugin key, you can still use it with the Backstage-specific environment variable.
EVENTCATALOG_LICENSE_KEY_BACKSTAGE=your-license-key
This will enable you to use EventCatalog within backstage.
Configuring Backstage to use EventCatalog
1. Install the plugin on Backstage
First install the plugin in your Backstage instance.
yarn add @eventcatalog/backstage-plugin-eventcatalog
2. Add the EventCatalog URL to the app-config.yaml
The EventCatalog plugin needs to know the URL of your EventCatalog instance. This can be set in the app-config.yaml file.
eventcatalog:
  URL: "https://demo.eventcatalog.dev"
3. Mapping Backstage resources to EventCatalog resources with annotations
Backstage and EventCatalog have different ways to create resources. For example backstage supports components, APIS, domains, systems etc, and EventCatalog supports resources (domains, services and messages (queries, commands and events)).
When you configure the plugin you need to map Backstage information to EventCatalog information, so the plugin knows which EventCatalog page to render.
We do this by adding annotations to the Backstage resources.
| Annotation | Required | Default | Description |
|---|---|---|---|
eventcatalog.dev/id | Yes | - | The id of the resource in EventCatalog |
eventcatalog.dev/version | No | latest | The version of the resource in EventCatalog |
eventcatalog.dev/collection | No | Uses the entity kind | The collection of the resource in EventCatalog. Options include services, domains, queries, commands, events |
Example of creating a new service in Backstage and mapping it to an EventCatalog resource:
apiVersion: backstage.io/v1alpha1
kind: Component
metadata:
  name: backend-service
  description: Backend API service
  annotations:
    github.com/project-slug: organization/backend-repo
    # Here we map the Backstage service to an EventCatalog resource
    # The id of the resource in EventCatalog
    eventcatalog.dev/id: InventoryService
    # The version of the resource in EventCatalog
    eventcatalog.dev/version: 0.0.2
    # The collection of the resource in EventCatalog
    eventcatalog.dev/collection: services
  tags:
    - nodejs
    - express
    - api
spec:
  type: service
  lifecycle: production
  owner: team-name
  system: example-system
  providesApis:
    - backend-api
  dependsOn:
    - resource:default/database
4. Using the components in Backstage
You have two options to use the components in Backstage:
Tabbed pages
The EventCatalogDocumentationEntityPage components, is a full page component that you can assign to any EntityLayout.Route.
import { EventCatalogDocumentationEntityPage } from "@eventcatalog/backstage-plugin-eventcatalog";
You can import the EventCatalogDocumentationEntityPage component to render EventCatalog pages as full pages in your Backstage entity.
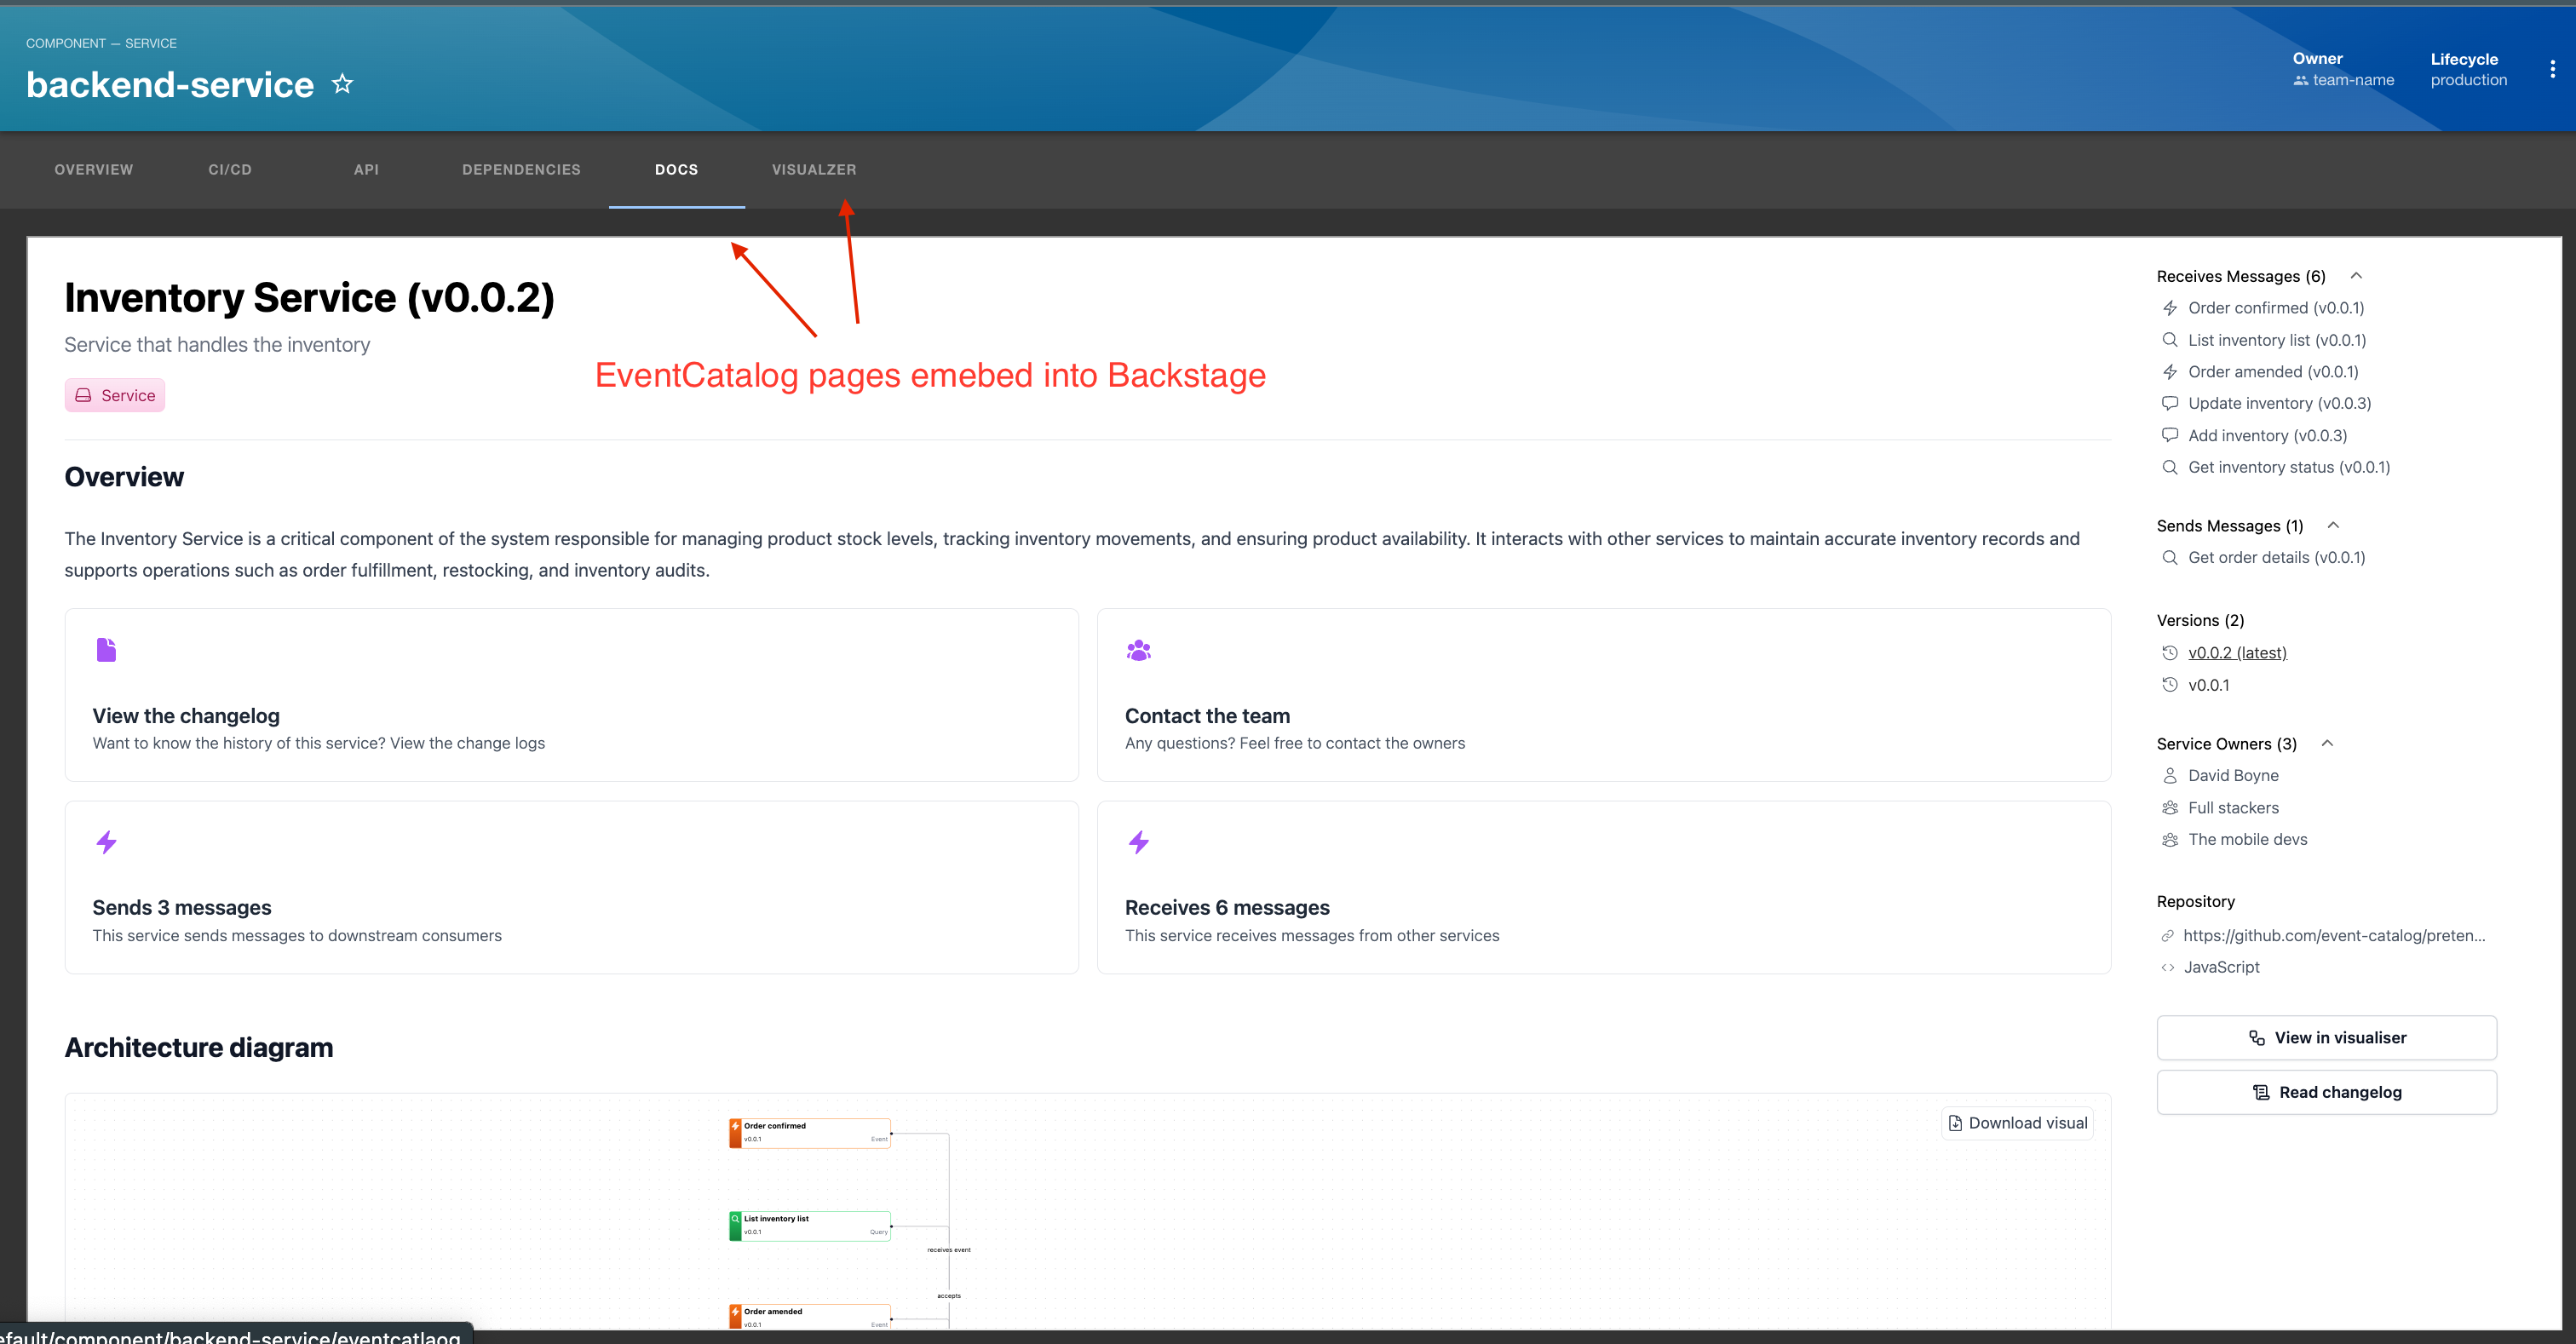
Rendered output example:
Usage Example:
// Will create a new tab called "Docs" and route called /eventcatalog. This will embed the docs for that
// entity in your page. Using the info from the app-config to map your Backstage ID to EventCatalog ID
<EntityLayout.Route path="/eventcatlaog" title="Docs">
  <EventCatalogDocumentationEntityPage page='docs' />
</EntityLayout.Route>

// Will create a new tab called "Visualzer" and route called /eventcatalog-visualizer.
// This will embed the EventCatalog visualiser to your Backstage entity
<EntityLayout.Route path="/eventcatlaog-visualizer" title="Visualzer">
  <EventCatalogDocumentationEntityPage page='visualiser' />
</EntityLayout.Route>

// Will create a new tab called "Entity Map" and route called /eventcatalog-entity-map.
// This will embed the EventCatalog entity map to your Backstage entity
<EntityLayout.Route path="/eventcatlaog-entity-map" title="Entity Map">
  <EventCatalogDocumentationEntityPage page='entity-map' />
</EntityLayout.Route>

// Will create a new tab called "Schema Explorer" and route called /eventcatalog-schema-explorer.
<EntityLayout.Route path="/eventcatlaog-schema-explorer" title="Schema Explorer">
  <EventCatalogDocumentationEntityPage page='schema-explorer' />
</EntityLayout.Route>

// Override the id, collection and version of the resource in EventCatalog
// you can choose to override what is rendered, (not read from your backstage configuration)
<EntityLayout.Route path="/eventcatlaog-entity-map" title="Entity Map">
  <EventCatalogDocumentationEntityPage page='entity-map' id="MyDomainId" collection="domains" version="0.0.1" />
</EntityLayout.Route>
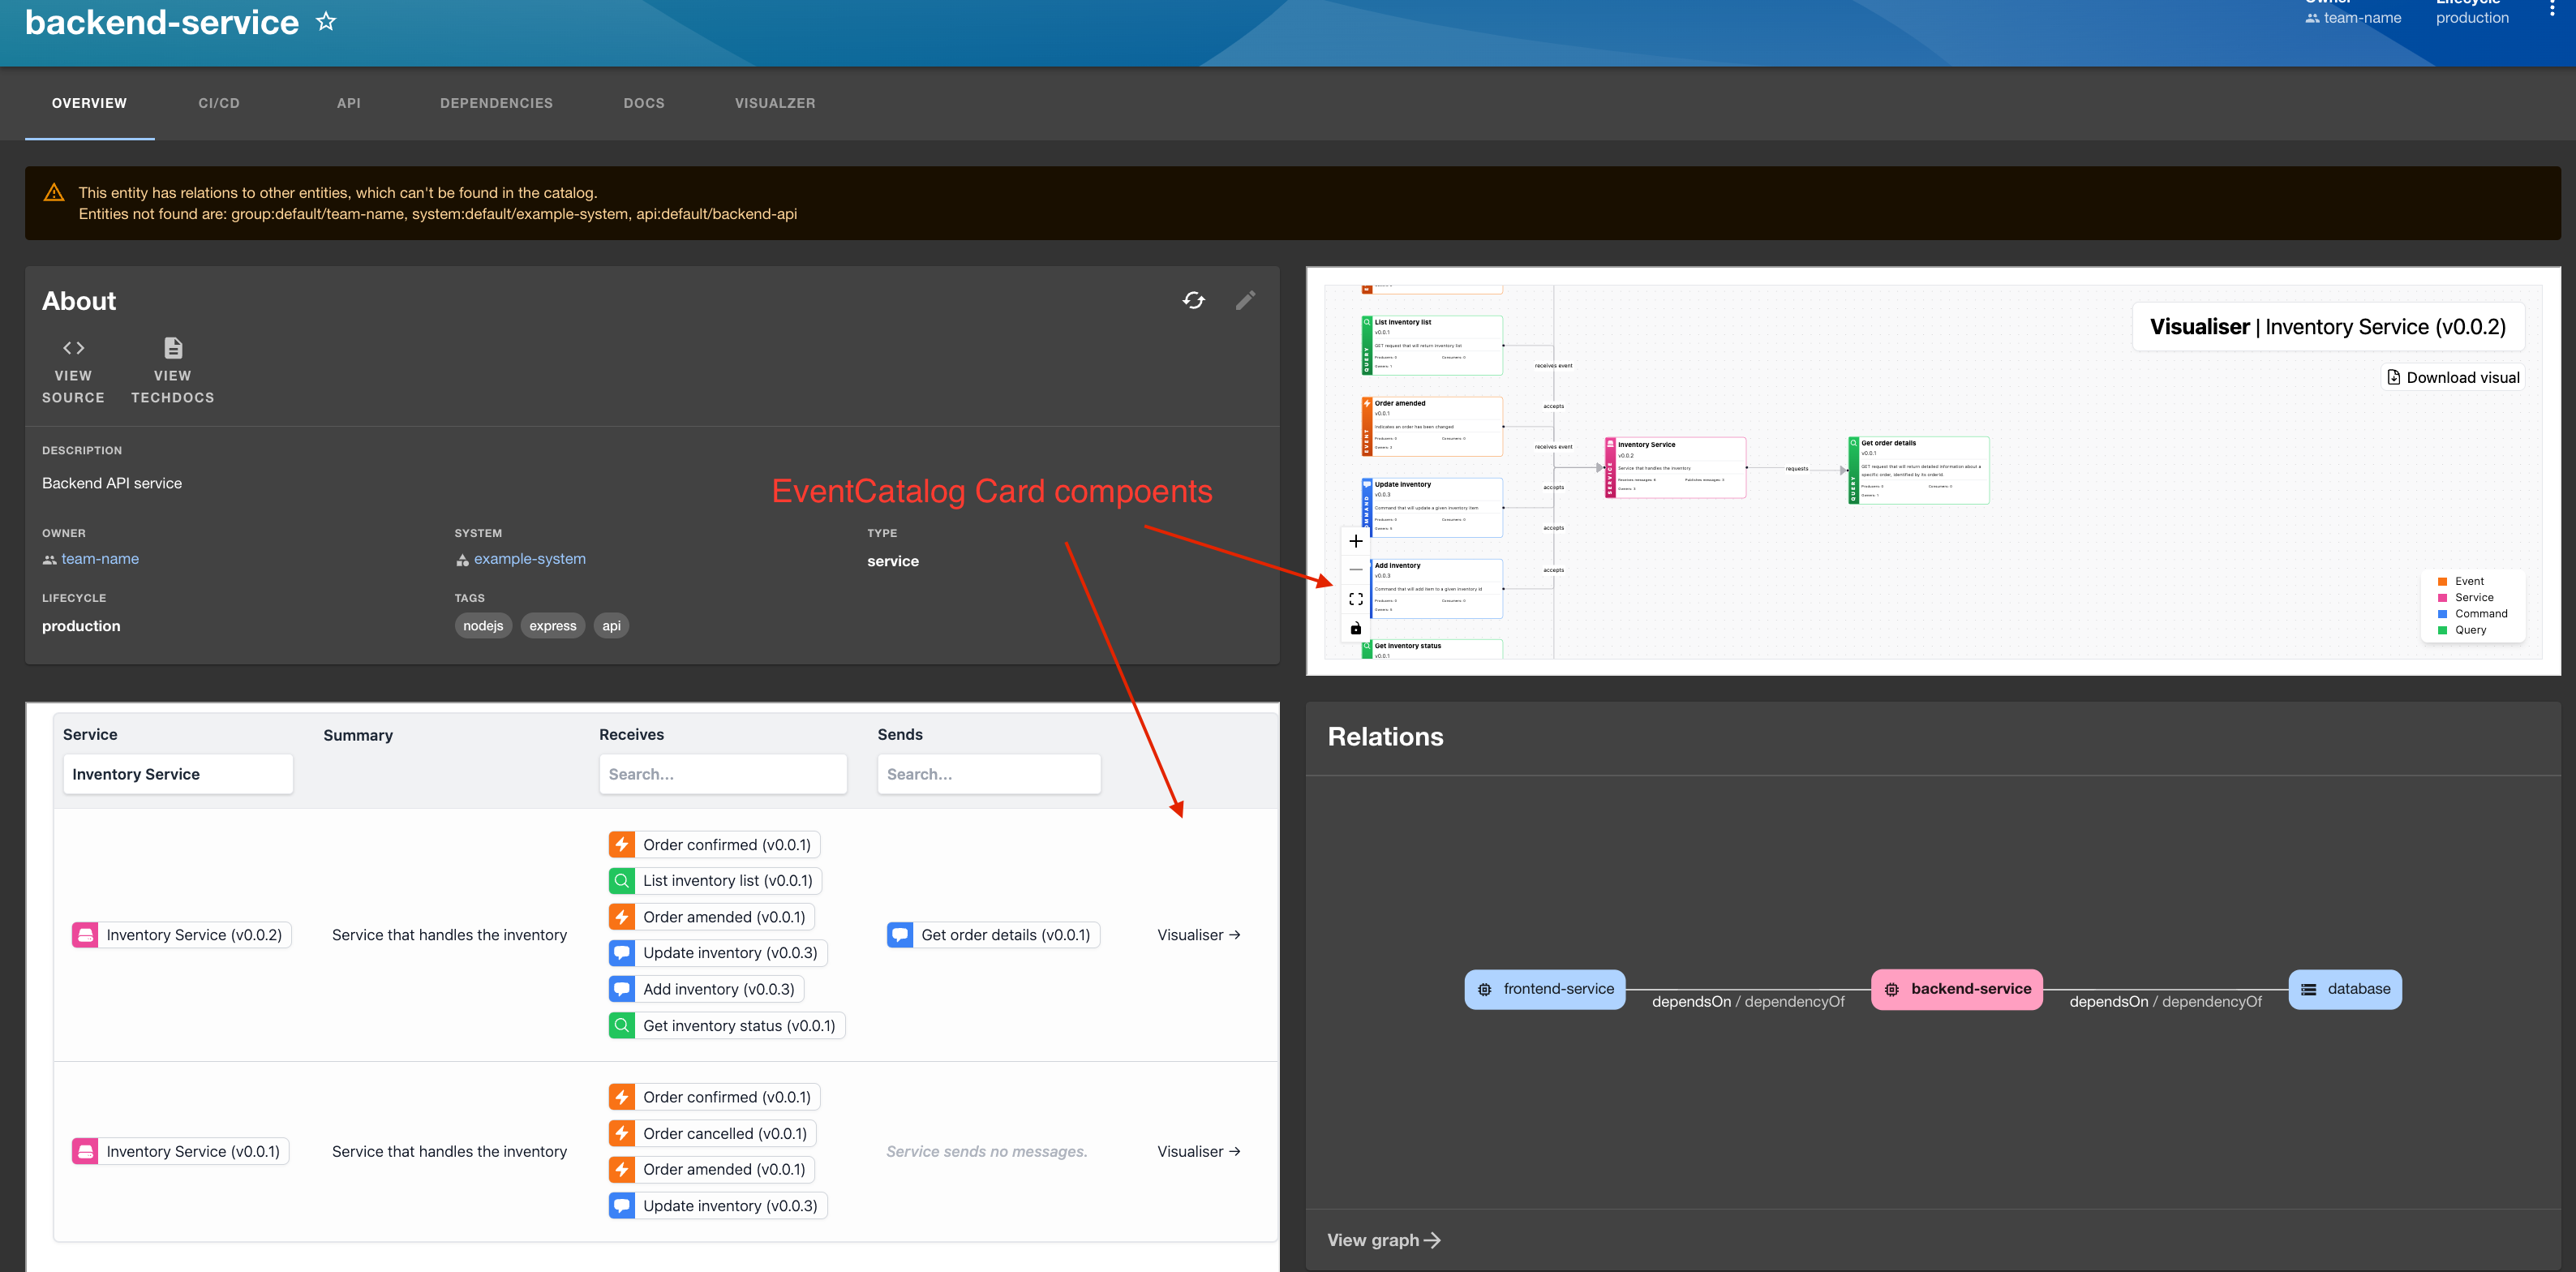
Card components
These components can be added to your pages as Cards, that can live inside the Backstage Grid System.

import {
  EventCatalogEntityVisualiserCard,
  EventCatalogEntityMessageCard,
} from "@eventcatalog/backstage-plugin-eventcatalog";

<Grid container spacing={3} alignItems="stretch">
  <Grid item md={6}>
    <!-- Backstage card -->
    <EntityAboutCard variant="gridItem" />
  </Grid>
  <Grid item md={6}>
    <!-- Adds the visualizer to a grid item in Backstage -->
    <EventCatalogEntityVisualiserCard />
  </Grid>
  <Grid item md={6} xs={12}>
    <!-- Adds the explore (messages) to a grid item in Backstage -->
    <EventCatalogEntityMessageCard />
  </Grid>
  <Grid item md={6} xs={12}>
    <!-- Adds the entity map to a grid item in Backstage -->
    <EventCatalogEntityEntityMapCard />
  </Grid>
</Grid>;
Migrating from < 1.0.0
We introduced some breaking changes in the plugin, and the ways you map your resources to EventCatalog resources.
Previously you mapped your resources to EventCatalog resources in the app-config.yaml file.
eventcatalog:
  services:
    - backstage-name: "backend-service"
      eventcatalog-id: "InventoryService"
Now you have to use annotations to map your resources to EventCatalog resources.
apiVersion: backstage.io/v1alpha1
kind: Component
metadata:
  name: backend-service
  annotations:
    eventcatalog.dev/id: "InventoryService"
    eventcatalog.dev/version: "0.0.2"
    eventcatalog.dev/collection: "services"
This are the preferred ways to map your resources to EventCatalog resources and following Backstage best practices.
Demo
If you want to learn how the code works in a basic demo you can see our demo on GitHub.